Guides / Finishing
Vibratory Finishing and Tumbling for Small Audio Hardware
October 27, 2026
Hi-fi products contain dozens of small metal parts that nobody sees but everybody touches: isolation feet, standoffs, spacers, washers, binding post collars, small knobs. Each has sharp edges and tool marks from machining. Deburring them one by one by hand is slow and expensive. Vibratory finishing does the job in bulk, and most orders for small hardware should start there.
What vibratory finishing does
Parts go into a bowl or tub with abrasive media: small ceramic, plastic or steel shapes, water and a liquid compound. The container vibrates, and the whole load slowly circulates. The media rubs the parts, wearing away burrs, rounding edges and smoothing the surface. A cycle runs from under an hour to several hours depending on the goal.
The result is an even, slightly satin surface with softened edges. It does not give a mirror and it does not give a sharp, crisp edge. It gives a uniform finish across hundreds of parts at a cost per part that hand work cannot match.
The related process, rotary barrel tumbling, spins the load in a drum. The motion is more aggressive, as parts drop onto each other. It suits tough steel hardware and can dent soft aluminum, so small audio parts usually go to a vibratory bowl.
Where it fits in the process order
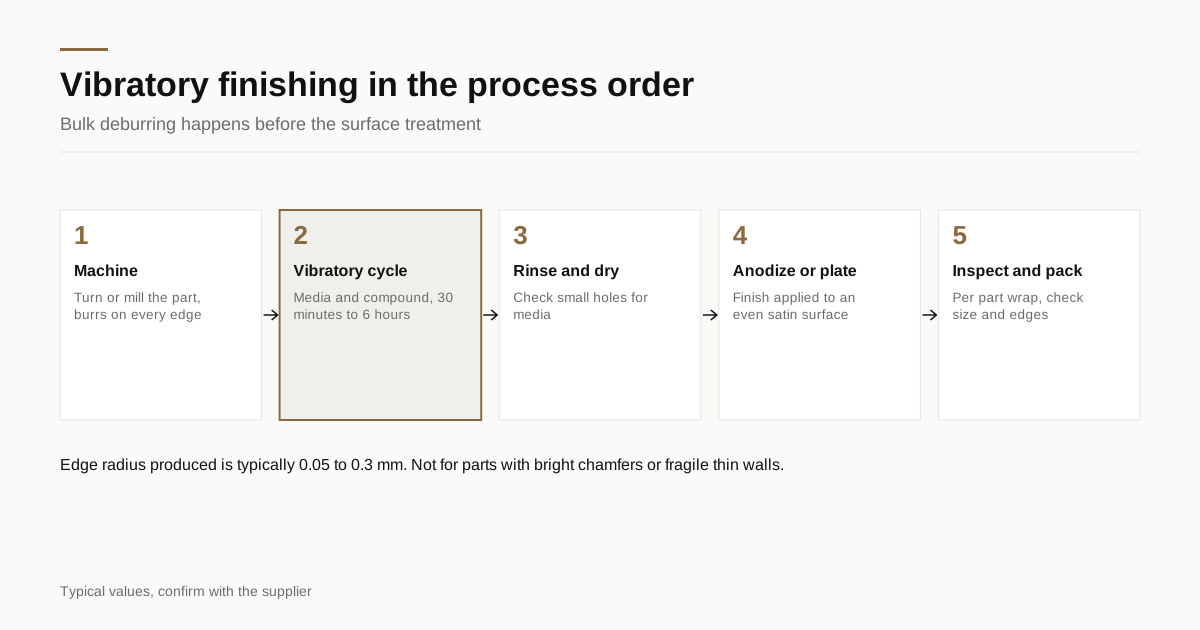
Vibratory finishing sits after machining and before the surface treatment.
- Machine the part.
- Vibratory finish to remove burrs and set the edge condition.
- Clean and dry.
- Anodize, plate or coat.
- Inspect and pack.
Doing it after anodizing would wear through the coating, so it is a pre-finishing step. Parts that need a bright polished edge are often finished first in bulk and polished afterwards only where needed. The process order for polished work is covered in mirror polishing aluminium and brass audio parts.
Typical figures
These are typical values, not promises. Confirm with the shop quoting your part.
| Item | Typical range | Notes |
|---|---|---|
| Cycle time, deburring only | 30 minutes to 2 hours | Light burrs on aluminum |
| Cycle time, smoothing | 2 to 6 hours | Heavier tool marks |
| Cycle time, polishing media | 2 to 8 hours | Finer media, dry or wet |
| Material removed per surface | A few to a few tens of µm | Depends on media and time |
| Edge radius produced | 0.05 to 0.3 mm | Not controllable to a fixed number |
| Load size | Hundreds to thousands of small parts | Varies with part size |
| Surface roughness after | Ra 0.2 to 0.8 µm | Starting condition matters |
The edge radius row is the one to watch. A vibratory process breaks edges, but it cannot hold a specific radius like a chamfer mill can.
Media: what goes in the bowl
The choice of media decides the result. Four families are common.
- Ceramic media cuts fast and suits steel and brass. On soft aluminum it can leave a dull, hazy surface.
- Plastic media cuts gently and suits aluminum and softer metals. It leaves a smoother finish and is less likely to dent.
- Steel media burnishes and compresses the surface without removing much metal. It gives a bright, work-hardened finish and is used on small steel and stainless parts.
- Organic media such as walnut shell or corn cob, usually dry and with a polishing compound, gives a final shine or dries and cleans parts.
Media shape matters too. Cones, pyramids and tri-stars reach different corners. Media that is too large to enter holes does not lodge in them, and media that is too small does. The shop should match the media to the smallest hole or slot in the part.
What the process does well
Deburring bulk hardware. Small turned parts such as spacers and standoffs come out of a lathe with burrs on every edge. A vibratory cycle clears them without touching each one.
Even, quiet cosmetic surfaces. A uniform satin finish on feet and collars looks consistent from part to part, and it provides a good base for anodizing.
Edge breaking on hidden parts. A light radius on every edge makes parts safer to handle and reduces chipping in anodize, since a sharp edge is where the coating cracks first.
Cost. Per-part cost can be a fraction of hand deburring, since a bowl handles a whole batch at once.
Where it goes wrong
Parts that damage each other. Soft aluminum parts bump when the load is too tight or the parts too heavy. Dents and scratches from part-to-part contact are the common fault. A higher media-to-part ratio, a lighter load or a divided bowl reduces it.
Media stuck in holes and threads. Small holes trap media. Parts need a check, a rinse or an air blow after finishing, and a note on the drawing about critical holes. The threading consequences are covered in threads in anodized chassis.
Over-rounded edges. A run that goes too long can lose edge definition. A visible knurl or a crisp step on a knob may soften. Short trial runs with inspection at set times define the correct cycle.
Dimension change. Material removal is small but not zero. On a part with a tight fit, such as a bore for a bearing or a shaft, check the size afterwards or mask the feature.
Poor fit for visible chamfers. A bright chamfer on a faceplate must not go into a bowl, as the process would round and dull it. See diamond cut chamfers on audio panels for how those edges are protected.
Wet and dry processes
Most deburring and smoothing runs wet. Water and a compound carry away the swarf, keep the media clean and prevent parts from welding to each other under pressure. The compound also affects the surface: an alkaline cleaner leaves metal bright, while a mild acid brightener can leave a slightly etched look that suits a following anodize.
Dry processes use organic media with a polishing paste. They are slower and gentler, and they suit a final shine on brass or a clean-up pass before lacquer. Dry runs produce dust, so shops usually keep them separate from wet work.
Ask which process applies to your part. A wet cycle for aluminum feet followed by anodize is the common route. A dry cycle on brass collars before lacquer is another. A shop that cannot say which one it plans to use has not thought about your part yet.
How a shop develops a cycle
A good shop does not guess the cycle time. It runs a trial.
- A small sample load of real parts goes into the bowl with a first-choice media and compound.
- The shop pulls parts out at fixed times, for example after 30, 60 and 120 minutes.
- Someone inspects each sample for burr removal, edge radius, surface texture, dents and trapped media.
- The cycle that gives acceptable parts with a margin is written into the process sheet.
- The first production load is checked against that sample, and the check is repeated whenever media wear changes the cut rate.
Media wears down, so cut rate drops over weeks. A cycle that deburred cleanly in the first month may leave burrs by the sixth. A shop that records media age, load size and cycle time can keep results steady. Ask whether this record exists, because it is a quick test of how organised the finishing line is.
Alternatives to compare
Vibratory finishing is not the only way to deburr and smooth small parts.
- Hand deburring gives full control over where metal is removed, and it suits low quantities and parts with a few critical edges. It is slow and varies from operator to operator.
- Bead blasting gives a uniform matte texture and removes light burrs, but it does not break edges evenly and it peens the surface. A comparison of the matte look is in bead blasting audio enclosures.
- Brushing gives a directional grain, suited to flat faces and not to small round parts. See brushed finish on audio panels.
- Centrifugal barrel finishing is faster and more aggressive than vibratory, and works for small steel or brass parts, but it risks denting soft aluminum.
- Thermal or chemical deburring reaches burrs inside cross holes and complex shapes, and is used for specialist parts, not typical audio hardware.
Choose by the part. A bag of 500 aluminum spacers is a vibratory job. Four hundred faceplates with a bright chamfer are not.
Which audio parts suit it
| Part | Suited? | Reason |
|---|---|---|
| Isolation feet, spacers, standoffs | Yes | Small, tough, hidden edges |
| Binding post collars, small washers | Yes | Many small identical pieces |
| Small knobs, caps | With care | Visible edges and knurl may soften |
| Faceplates, large panels | No | Too big, face would scratch |
| Parts with bright chamfers | No | Edge would be rounded |
| Fragile thin parts | No | Risk of bending or damage |
For feet and spikes specifically, the geometry and material choices are explained in isolation feet and spikes.
Cost and minimum quantity
Vibratory finishing is cheap per part but has a setup. A shop needs enough parts to run a sensible load, and it may charge a minimum lot, since a bowl run takes the same time whether it holds 50 parts or 500. Very small runs of under about 50 parts often go to hand deburring instead, which is slower but flexible.
If your order mixes parts of different sizes, the shop may run them in separate loads, because a small part loses itself in a bowl of large parts and large parts damage small ones. Group parts by size and material in the RFQ and say which need different treatment.
What to put on the drawing and in the RFQ
- A general note: “deburr by mass finishing, edge break 0.1 to 0.3 mm”
- Features that must stay sharp or must not be touched: bright edges, knurls, threads
- Critical holes that must be clear of media afterwards
- Dimensions that apply after finishing
- The surface target after finishing, or a reference part
- The next process, such as anodize, so the shop leaves a suitable surface
- Quantity per part number
Write a short acceptance rule too: the inspection distance, light and zones from cosmetic inspection lighting and viewing distance apply here. Then send the RFQ and we match it with up to 3 shops that run mass finishing for small parts, with a reply within 24 business hours.
Frequently asked questions
What is the difference between vibratory finishing and tumbling?
Both put parts and abrasive media in a container and use motion to wear the surface. A tumbling barrel rotates and parts cascade over each other, which is more aggressive and can dent soft parts. A vibratory bowl shakes the load, giving a gentler and more even action that suits small audio hardware.
Can tumbling replace hand deburring on audio parts?
For hidden edges and small parts, often yes, and at much lower cost. For a visible bright chamfer or a fine radius, no, because the process rounds edges unpredictably and cannot be aimed at one spot.
Does the process affect threads and holes?
Yes. Media can lodge in small holes, and the process slightly changes thread and bore size. Plan a cleaning step, check small holes after finishing and state which features must stay sharp or unchanged.
Need a quote for this part?
Send the drawing. We match you with up to 3 shops and reply within 24 business hours.
Get matched with an audio parts shop