Guides / Design for Manufacture
Threads in Anodized Chassis: Masking, Inserts and Re-Tapping
October 23, 2026
Anodizing is great for a faceplate and awkward for a screw hole. The coating adds thickness to every surface it touches, including the inside of a tapped thread, and it does not conduct electricity. Both facts cause trouble on a chassis that is assembled by hand and opened again for service.
What anodizing does to a thread
A Type II coat of 10 to 15 µm grows about half of that into the surface and half outward. On a thread flank that is a few micrometres per side. A coarse M4 thread has enough clearance to absorb it. A fine thread, or a thread cut to a tight class, may bind or refuse a screw entirely.
Hard anodize makes the problem larger, since the coating is two to five times thicker. A hard coat inside a small tapped hole can close the thread so tightly that the screw cuts through the coating when forced in, breaking the oxide and leaving debris in the hole. The coating also has a different hardness from the aluminum underneath, so the thread wears unevenly.
The second effect is electrical. The oxide is an insulator. A screw that is meant to give a ground connection from a panel to the chassis will not do so through an anodized thread. Safety earth and shielding points need bare metal. The issue is covered from the shielding side in EMI shielding for audio enclosures.
Four ways to handle a thread
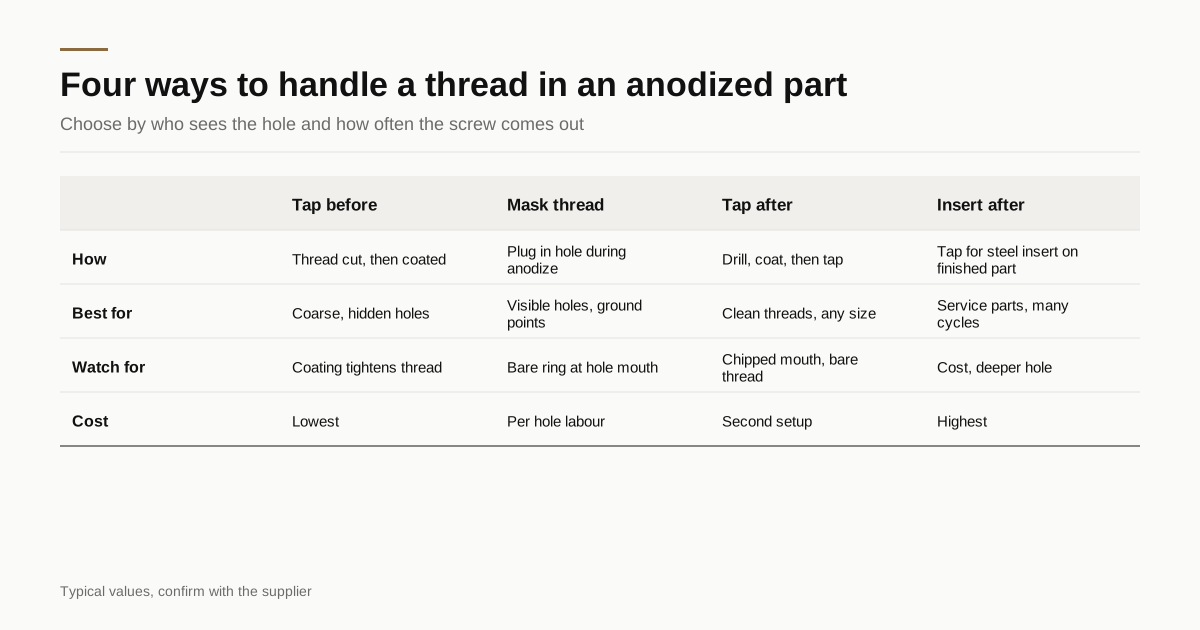
| Method | How it works | Good for | Watch for |
|---|---|---|---|
| Tap before, anodize with thread open | Thread is cut, then coated | Coarse threads, hidden holes, low cost | Thread tightens, small debris, weaker fit |
| Mask the thread, anodize around it | Plug or cap seals the hole during anodizing | Visible holes, ground points | Masking labour, a bare edge at the hole mouth |
| Pre-drill, anodize, tap after | Hole is drilled to tap size, coated, then tapped | Clean threads, any size | Bare thread, mouth of hole may chip |
| Insert after anodize | Hole is drilled and tapped for a steel insert, installed on the finished part | Service parts, many assembly cycles | Cost, pull-out and torque limits |
None of these is universally right. Pick based on how often the screw is removed and who sees the hole.
Tap after anodizing: the usual answer for hidden threads
For threads inside the chassis where no one looks, a common practice is to drill the hole to tap size, anodize the part, then cut the thread in a final operation. The tap cuts through the oxide, so the thread is clean and has the proper fit. The surface of the thread is bare aluminum, which is invisible and harmless inside an enclosure.
Two cautions apply. The tap can chip the coating at the mouth of the hole, leaving a small bright ring. If the mouth is visible, a small countersink before anodizing helps, since the coating then wraps over a chamfer instead of a sharp edge. And a tapping operation on a finished face risks a scratch from the fixture or a chip, so the shop needs a protected setup.
Masking for visible and grounding holes
If a threaded hole sits on a visible face, or if it needs bare metal for a ground connection, masking keeps the coating out. The shop plugs the hole with a rubber or plastic plug, or covers it with a cap, before the part goes in the bath. After anodizing, the plug comes out and the thread is clean.
Masking has limits. Plugs leave a small unanodized ring around the hole mouth, a slight halo where the mask met the surface. On a show face that halo is a cosmetic fault. Masking also adds labour per hole, so a panel with forty threaded holes costs noticeably more than one with four.
For ground points, the drawing should name which holes must be bare metal and what area around each one stays uncoated. The detailing of such notes appears in drawing callouts for cosmetic faces.
Inserts: when screws come out often
A thread cut directly in aluminum survives a handful of assembly cycles. A service access panel, a battery cover or a part that technicians open repeatedly will wear its thread out. A steel or stainless insert solves that, since the insert thread is stronger than the parent metal.
Two common families exist. Wire thread inserts are coils of diamond-section wire that screw into a tapped hole and give a hard thread inside it. Solid bushing inserts are machined sleeves with an external thread or a knurl and an internal thread, and are pressed or screwed in. Self-tapping versions cut their own thread in the parent hole.
Install them after anodizing. A steel insert in an anodizing bath is a problem: it can contaminate the bath, it will not take the coating and the mix of metals can pit. The sequence is drill, anodize, tap or ream for the insert, install the insert on bare metal in the hole and check torque and pull-out on a sample.
Inserts need a deeper hole than a plain thread, a clear wall around them and the right installation tool, so plan the geometry early. The wall thickness and plate-thickness limits that govern this are in machining thick front panels.
Thread engagement: more important than the finish
Whatever method you choose, a screw into aluminum needs enough thread. A common rule of thumb is engagement of about 1.5 to 2 times the screw diameter in aluminum, compared with about 1 times in steel. An M3 screw wants 4.5 to 6 mm of engagement, which rules out a 3 mm thick sheet for a load-bearing thread. For sheet, use a clinch nut, rivet nut or a thicker boss.
Fine threads look neat, but they are weaker in soft aluminum than coarse threads, because the thread depth is shallow. Use coarse metric threads unless a mating part forces a fine pitch. Check the rules for your own design against the supplier’s recommendation and against the screw standard.
The failures that show up at assembly
Four faults repeat on first production runs.
Screws that will not start. The thread was cut before anodizing and the coating tightened it. The shop or the assembler forces the screw, which cuts a new groove and breaks the coating into the hole. The fix is a re-tap with a plug tap, which should have been planned as an operation, not discovered on the line.
Stripped threads after service. A thread in 2 mm of aluminum, opened and closed five times by a technician, gives up. The drawing never said the panel was a service part. Tell the shop which screws are removed in normal life.
Ground points that do not ground. The screw tightens but the multimeter reads open. The coating sits between the lug and the chassis. A bare-metal area was never specified, or the shop masked the wrong side of the hole.
A bright ring around a hole. The tap chipped the coating at the mouth, or the plug left a halo. On a visible face this is a cosmetic reject. A small chamfer before anodizing and a clear acceptance note prevent most of these.
Cost of each approach
Cost follows labour, not material. Tapping before anodizing adds almost nothing, since the shop taps while the part is on the machine. Masking adds a plug and a removal step per hole. Tapping after anodizing adds a second setup and a handling step on a finished part. Inserts add the insert itself, a deeper hole, an installation step and a pull-out check.
On a panel with a few holes the differences are small. On a chassis with 30 or more threaded points, a choice to mask all of them can add a visible share of the part price. Sort the holes into three groups (visible and grounding; hidden and rarely opened; hidden and often opened) and give each group its own method. The overall cost logic is in what an amplifier chassis costs to manufacture.
Fasteners and galvanic matching
A steel screw in an anodized aluminum hole is generally fine indoors. The anodic coating reduces contact between the two metals. A bare stainless screw into bare tapped aluminum can seize over time, particularly after repeated tightening, so a small amount of anti-seize compound or a different fastener coating helps.
Black oxide or zinc-plated steel screws pair well with black anodize cosmetically. If the screw head is visible, specify the head style and finish on the drawing. Screw choice also belongs in the cosmetic specification, since a mismatched shade of black on a hex head is more visible than people expect.
What to put on the drawing
- For each threaded hole: thread size, depth and whether it is tapped before or after anodizing
- Which holes are masked, and which need bare metal for grounding
- Which holes take inserts, the insert type and that installation follows anodizing
- Countersink or chamfer at the mouth of visible holes
- Torque and number of assembly cycles for the screw, if known
- Which dimensions are measured after coating, since coating growth matters on tight fits
The coating-thickness side of this is explained in hard anodizing vs Type II. To build a full finish note, use the finish spec builder.
A short checklist
- Is the hole visible? If yes, mask it or tap after anodize with a countersink.
- Does it need a ground connection? If yes, keep it bare.
- Will the screw come out often? If yes, use an insert installed after anodizing.
- Is the engagement at least 1.5 times the screw diameter? If not, change the boss.
- Is the thread fine? Consider a coarse pitch.
When the drawing is ready, send it through the RFQ form and we match it with up to 3 shops that handle masking and insert work, with a reply within 24 business hours.
Frequently asked questions
Should I tap holes before or after anodizing?
It depends on how visible the thread is and how critical the fit. Tapping before anodizing is cheaper but the coating grows into the thread and can tighten or clog it. Tapping after anodizing gives a clean thread, but the thread surface is then bare aluminum. For hidden threads that is normal. For visible threads, mask them or use an insert.
Do thread inserts need to be installed before anodizing?
Usually after. Most inserts are steel or stainless and should not sit in an anodizing bath. The hole is tapped for the insert after anodizing, then the insert is pressed or screwed in. If the insert is installed first, it must be removed or masked, which adds cost.
Why do screws strip in aluminum chassis?
Aluminum is soft, and a fine thread with short engagement has little strength. Repeated assembly cycles wear it. Use enough thread length, fewer assembly cycles on service parts, or a steel insert where the screw will be removed often.
Need a quote for this part?
Send the drawing. We match you with up to 3 shops and reply within 24 business hours.
Get matched with an audio parts shop