Guides / Design for Manufacture
Machining Thick Front Panels: Pockets, Chamfers and Flatness
October 19, 2026

A thick front panel, usually 6 to 20 mm of aluminum plate, is the single most visible part of a hi-fi component. It also moves more than people expect while it is being made. A panel that measures flat at the machine can bow after it comes off the fixture, and once it is anodized the curve is easy to see in a showroom light. The front panel is one section of our guide to custom amplifier chassis.
Why a thick panel behaves badly
The plate you start with is not neutral. Rolled and heat-treated aluminum plate holds residual stress, balanced across the thickness like a spring held flat. Mill away a large pocket from one face and you remove part of that balance. The remaining metal relaxes and the panel bows toward the pocketed side.
Three things make it worse. A panel with a large back pocket removes more material from one side than the other. A thin remaining web around the pocket leaves less metal to resist movement. And one heavy roughing pass at full depth releases stress all at once, which gives the part no chance to stabilise in steps.
A thick panel is therefore not a simple milling job. The order of operations is the process.
The order that keeps a panel flat
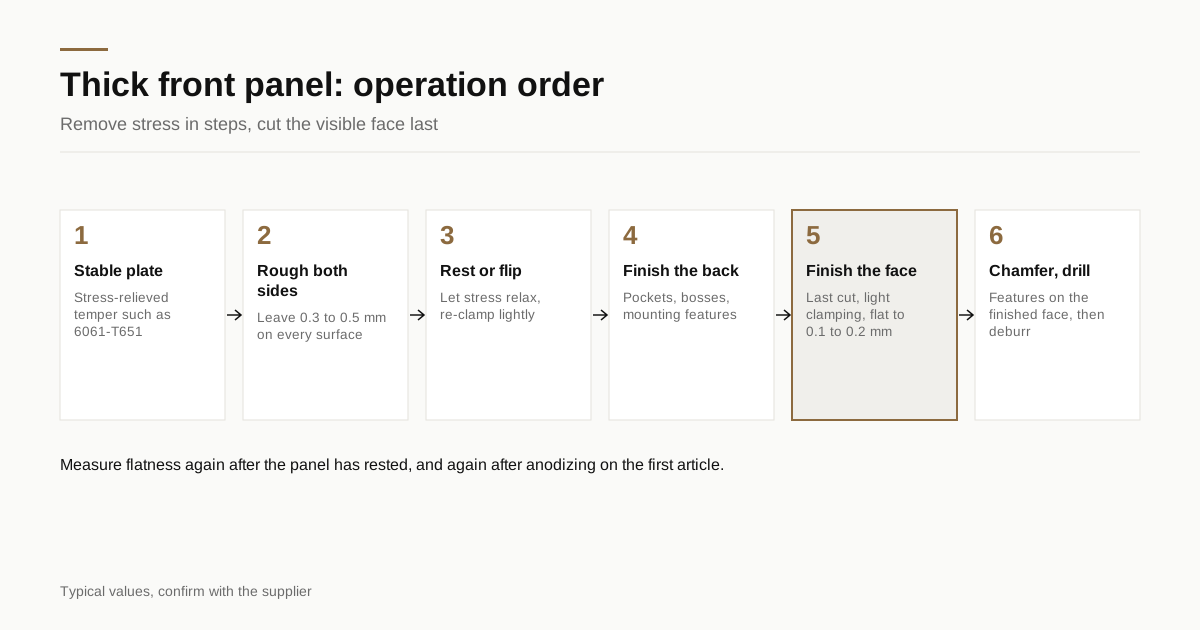
A sound plan for a front panel follows a logic like this. Details vary by shop and by part.
- Start with stress-relieved or suitably stable plate. A common choice is 6061 in a T651 temper, where the T651 designation marks stress relief by stretching. Plate in this temper is a better starting point than a plain T6 plate, and the shop should know the difference.
- Rough the faces and the pockets with material left on. Leaving 0.3 to 0.5 mm on every surface gives the plate room to relax before the final cut.
- Let the part rest, or flip it. Many shops take the roughed panel off the machine, let it sit and then re-clamp lightly for the finishing pass. Others flip the part and take light cuts from both sides alternately.
- Finish the back first, then the front. The back pocket and mounting features are completed first, and the visible face is the last cut, so the final surface is made on a stable part.
- Use light clamping on the finish pass. Heavy clamping forces the panel flat on the table, the final cut makes it flat, and then it springs back when released. Vacuum or soft-jaw fixtures reduce this.
- Chamfer, drill, engrave and deburr after the face cut. These features sit on top of the finished face and should not disturb it.
If a shop describes a one-setup, one-pass approach for a 15 mm panel with a big pocket, that is a flag.
Typical figures
These are typical values, not promises. Confirm with the shop quoting your part.
| Feature | Typical value | Notes |
|---|---|---|
| Panel thickness | 6 to 20 mm | Thinner than 6 mm is sheet territory |
| Face flatness | 0.1 to 0.2 mm over 430 mm | Tighter is possible and costs more |
| Parallelism front to back | 0.1 mm | Matters for fit against the chassis |
| Back pocket depth | 3 to 10 mm | Leave at least 2 mm of web in the face |
| Wall left around pocket | 3 mm or more | Thin walls move and chatter |
| Knob and jack hole position | ±0.1 mm | Visible against the engraving |
| Chamfer width | 0.5 to 1.5 mm | See the diamond cut note below |
Choosing the thickness
Panel thickness is partly a styling decision and partly a mass decision. A 10 mm panel feels solid and carries a bright chamfer well. A 20 mm panel reads as heavy and expensive, but it multiplies material cost, machining time and shipping weight in the same way.
A rough guide for a 430 mm rack width panel: 3 to 5 mm is sheet or thin plate with a different behaviour, 6 to 10 mm is the common premium range, 12 to 15 mm suits a statement product and above 15 mm is rare outside high-end monoblock amplifiers. Weight matters in freight and in the tolerance stack, since a heavy panel sags slightly on soft mounting points.
If the design only needs the panel to look thick, a thinner plate with a visible edge detail can do the job at lower cost. Ask the shop to quote two thicknesses, so the saving is a number on the page and not a guess.
Pockets: where thick panels get expensive
The back of a front panel is usually hollowed out to hold a circuit board, a display or a transformer lead. The cost of that pocket comes from three drivers.
Depth. Cutters have a practical reach, around three to four times their diameter before they chatter and need slower feeds. A deep pocket needs a longer tool, and a longer tool needs lighter cuts.
Corner radius. A small inside radius needs a small tool, and small tools cut slowly. If a pocket corner can have a 3 mm radius instead of 1 mm, a larger tool can do the job, which saves cycle time on every part.
Wall thickness. A thin wall left between the pocket and the visible edge is a flatness risk and a chatter risk. Anything under about 2 mm in aluminum plate is risky, and 3 mm is a safer floor.
Ask the shop which pockets drive the time. A design that shifts a pocket by 5 mm, thickens a wall or rounds a corner can move cost noticeably without changing what the customer sees. The wider logic of what you pay for is in what an amplifier chassis costs to manufacture.
Flatness checks: what to ask for
A flat panel should be verified, not assumed. Three checks are common.
- Surface plate and feeler gauges. The panel sits on a granite plate and the gap beneath is measured. It is fast and good enough for most audio panels.
- Straightedge and light. A machinist’s straightedge across the face shows a gap as a sliver of light. It catches bow immediately.
- CMM or optical scan. For a premium product with strict tolerances, a coordinate measuring machine maps the face. It costs more and is rarely needed below a high price point.
Ask when the check is done. A panel measured on the machine is not the same as a panel measured 24 hours later, once residual stress has had time to move. For a premium product, ask for the measurement after the panel has rested.
Flatness after anodizing
Anodizing does not bend a panel by itself, but two things can change flatness afterwards. Racking points and hanging can leave slight distortion on a thin or large panel. And the rack contact mark is a cosmetic matter on its own, covered in the notes on drawing callouts for cosmetic faces, which show how to mark the area where a rack contact is acceptable.
Measure flatness after finishing as well, particularly for the first article. First article inspection for cosmetic parts explains the review that catches this before the full run.
Chamfers and edges
The chamfer on a front panel is cut after the face is finished, since it needs a stable reference. A standard chamfer mill leaves a satin edge. A bright diamond cut edge is a separate pass, described in diamond cut chamfers on audio panels. Decide which you want before the quote, since it changes the setup.
Edge breaks on hidden sides can be left simple. On visible edges, specify the radius or chamfer size and which edges it applies to, so the shop does not guess.
Tolerances that the eye sees
Front panels are judged by gaps and alignment. Three tolerances matter more than the others.
- Hole position for knobs, buttons and the display window. A 0.3 mm offset in one knob against the engraved ring is visible.
- Cutout size for the display window or LED, since the bezel gap shows the error.
- Panel width and height, because the gap to the side cheeks must stay even.
The relationship between these is the tolerance stack, explained in tolerance stack basics for audio enclosures. A front panel that is flat and the right size can still look wrong if the stack is off.
What to put in the RFQ
- Panel dimensions, thickness and alloy with temper, for example 6061-T651
- Face flatness requirement and where it applies
- Pocket depths, wall thicknesses and corner radii, flagged where flexible
- Chamfer type: standard or diamond cut
- Finish: brushed, blasted or polished, then anodize type and colour
- Quantity and expected yearly volume
- A request for flatness measurement after rest, on the first article
When the drawing is ready, send the RFQ and we match it with up to 3 shops used to thick-panel work, with a reply within 24 business hours.
Frequently asked questions
Why does a thick front panel go out of flat after machining?
Plate holds residual stress from rolling and heat treatment. Removing a lot of material from one side lets the stress relax, and the panel bows. Shops reduce this by taking balanced cuts from both faces, roughing first and finishing later and using stress-relieved plate.
How flat should a front panel be?
For a visible face on a 430 mm wide rack panel, 0.1 to 0.2 mm overall flatness is a realistic range, and tighter costs more. What matters visually is that the panel sits flat against its neighbours and the bezel gaps stay even.
Does pocket depth affect cost?
Yes, mostly through cycle time and tool reach. A deep narrow pocket needs a long thin tool, slower feeds and often a second finishing pass. A shallow wide pocket machines quickly. Asking whether the back pocket can be shallower is one of the cheapest design questions.
Need a quote for this part?
Send the drawing. We match you with up to 3 shops and reply within 24 business hours.
Get matched with an audio parts shop