Guides / Finishing
Hard Anodizing vs Type II on Audio Parts: Wear, Colour and Cost
October 18, 2026
Two numbers decide most anodizing choices for audio gear: how thick the coating is and how much colour you need. Type II gives you colour. Type III, called hard anodizing, gives you wear resistance. Most orders need one or the other, and a small number need both, which is where the trade-offs start. The coating type is one choice in our guide to audio panel finishes.
What the two types are
Both are anodizing: an electrochemical process that grows an aluminum oxide layer out of the aluminum surface. The part is the anode in an acid bath, and the oxide that forms is part of the metal, not a paint on top of it.
Type II uses a sulfuric acid bath at room temperature or a little above. The oxide is relatively open and porous, which is why it takes dye well. After dyeing, the pores are sealed in hot water or a nickel-free sealant.
Type III runs in a sulfuric bath near freezing with higher current density. The oxide is thicker, denser and harder. It is usually sealed too, though some wear applications leave it unsealed to keep maximum hardness. The common US specification for both types is MIL-A-8625, which names Type II and Type III, and ASTM B580 is a related reference for general anodic coatings. Check the current revision with your supplier before you write either on a drawing.
Typical figures
These are typical values, not promises. Confirm with the shop quoting your part.
| Property | Type II | Type III (hard) |
|---|---|---|
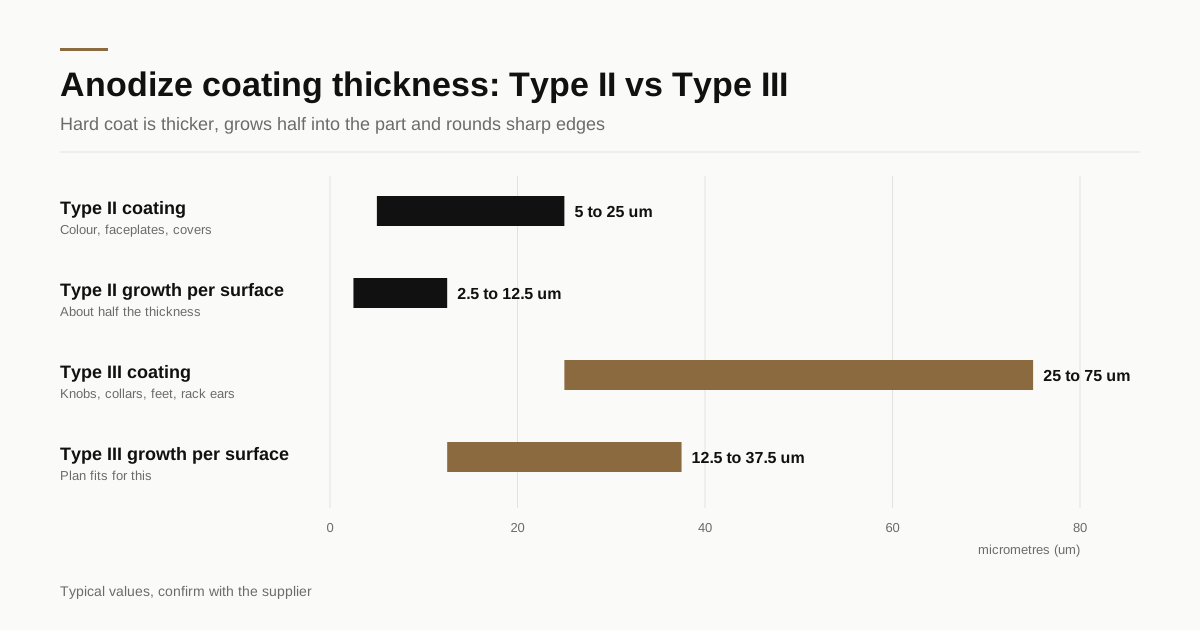
| Coating thickness | 5 to 25 µm | 25 to 75 µm |
| Growth per surface | about half the thickness | about half the thickness |
| Colour range | Wide, clear to black, most colours | Natural grey to bronze, black by dye |
| Surface feel | Smooth, slightly satin | Slightly rougher, matte |
| Wear resistance | Moderate | High |
| Edge behaviour | Keeps sharp edges fairly well | Rounds and chips sharp edges more |
| Relative price | Baseline | Often 1.5 to 3 times Type II per part |
The last row varies a lot with part size and quantity, but the direction is reliable. Hard anodizing runs longer, needs cooling and a tighter process window, and many small shops do not have the tank at all.
Where each type belongs on an audio product
Type II is right for visible, low-contact faces. Faceplates, top covers, side cheeks, remote control bodies and anything that a hand touches briefly. A clear or lightly dyed Type II coating keeps the metal looking like metal. If you want a colour that matches across parts, the process of controlling it is covered in the guide to anodize colour matching.
Type III is right for parts that slide, thread or take repeated abuse. Rotary volume knobs that turn against a bushing, source selector collars, rack ears that get bolted in and out, isolation feet that scrape across a shelf, cable clamps. The wear rate on these parts is what separates a product that still looks new in two years from one that looks tired in six months.
The middle cases are where decisions are hard:
- Knobs. A knob is looked at and touched. Type II in black looks best and wears through at the edges after a few years of heavy use. Type III in black is a bit flatter in appearance and holds up longer. Some brands choose Type II on the face of the knob and accept the wear. Others choose hard anodize on the whole knob and live with the matte look. The geometry side of knobs is in CNC volume knob manufacturing.
- Feet and spikes. They scratch other surfaces and get scratched themselves. Hard anodize on aluminum feet is common. For stronger contact loads a stainless foot is a different answer, covered in isolation feet and spikes.
- Platters and turntable parts. Weight and wear matter more than colour. See turntable platter machining for how the finish interacts with balance and flatness.
Dimension growth: the surprise on the drawing
Anodizing is not a zero-thickness treatment. The oxide grows into the surface by roughly half the coating thickness and out of the surface by the other half. A 50 µm hard coat therefore adds about 25 µm to every exposed surface and removes about 25 µm of base metal underneath.
On a flat plate the change is invisible. On features with tight fits it matters.
- Shafts and bores. A 6 mm shaft with a 25 µm growth per side ends up 50 µm larger in diameter. A bearing or pot shaft that was a clean fit before anodizing may not enter afterwards.
- Threads. Internal threads can close up and external threads can bind. The usual answer is to mask threaded features, then clean them out afterwards with a tap, or to cut the thread slightly oversize before anodizing. The related issues of inserts and re-tapping are covered in threads in anodized chassis.
- Press fits and locating pins. If the fit is critical, mask the surface or specify that the dimension applies after coating.
State plainly on the drawing which dimensions apply after coating and which apply before. Without that note a shop has to guess, and either guess can be wrong.
Colour: why hard anodize black is the only easy dye
Hard anodize is dense, so dye goes in slowly and unevenly. Natural colour depends on the alloy: 6061 comes out grey to bronze, high-copper alloys come out darker and sometimes patchy, and cast alloys can be nearly black with blotches.
If the part needs black, a hard coat followed by a black dye gives a uniform deep black. If it needs any other colour, either accept the natural bronze-grey, or choose Type II. This is why products that show red, blue or gold on the front often show a different, simpler finish on the knobs or feet that need to survive handling.
Mixed alloy products raise the colour question again. Plate and extrusion do not match in colour under either type. The guide to aluminium alloys for anodized audio parts shows what to expect when two alloys sit next to each other.
Sealing, corrosion and feel in the hand
Sealing closes the pores after anodizing. A sealed Type II coat resists fingerprints, sweat and mild cleaning products far better than an unsealed one, and it locks dye in so colour does not bleed. Hard coat is often sealed as well, but a few wear applications leave it unsealed for maximum hardness. For audio parts that people touch, sealed is the safer default, so say so on the drawing.
Hand feel differs too. Type II has a fine satin surface that most people read as premium metal. Hard anodize is rougher and more matte, and on a knob that difference is noticeable the moment you turn it. If the feel of a control is part of the product, ask the shop for sample coupons in both types and compare them in your hand before you choose.
Corrosion is rarely the deciding factor indoors. Both types protect aluminum well in a living room. The difference shows up on products that live near a coast or travel in a road case, where a thicker coat lasts longer before it shows pitting.
What each choice adds to the bill
The price difference is not only the tank time. Type III adds:
- Cooling and a narrower control window, so batches are smaller
- Masking time for threads, bores and contact points
- A higher rejection risk on parts with sharp edges, because hard anodize can craze or chip at an edge
- Occasional re-work for parts that grew out of tolerance
Per-part cost on small runs is dominated by rack time and minimum lot. A shop with a hard anodize line may need 50 to 100 parts to fill a rack economically, which is the same logic described in low volume anodizing and minimum orders. Mixing Type II and Type III parts in one order means two lots at two process settings, so group parts by finish and say clearly which part gets which type.
Specifying it on the drawing
A clear note covers six things:
- The standard and type: for example “anodize per MIL-A-8625 Type III Class 2” or “Type II Class 2”
- The target coating thickness or range
- The colour and a reference sample, if colour matters
- Which dimensions are measured after coating
- Masked features, such as threads or contact faces
- Sealing: sealed or unsealed
Class 1 is undyed and Class 2 is dyed in the same specification, which is why both type and class belong in the note. The finish spec builder turns these choices into a drawing note a shop can quote from.
A short decision rule
- Does the part slide, thread or take scraping? Use Type III.
- Is the part mainly looked at, and does colour matter? Use Type II.
- Does the part need both? Use Type III black, or Type II and accept visible wear over time.
- Are there tight fits? Mask them or state the dimension after coating.
- Is the order under about 50 pieces? Ask the shop about its minimum lot before you choose.
Send the drawing with the finish note through the RFQ form, and we match it with up to 3 shops that run the type you need, with a reply within 24 business hours.
See also the reference pages on anodize callouts for audio drawings, anodize thickness and seal tests and scratch and abrasion tests.
Frequently asked questions
Can hard anodize be dyed any colour?
Not freely. Hard anodize is grown in a colder, stronger bath and produces a denser, darker coating that takes dye poorly. Natural hard anodize ranges from grey-bronze to near black depending on alloy and thickness. Black is the practical dye option. Bright reds, blues and golds are a Type II job.
Does hard anodize change the size of a part?
Yes. The coating grows both into and out of the surface, roughly half and half. A 50 micrometre coating adds about 25 micrometres per surface. On a 10 mm turned shaft that is a visible diameter change, so threads, bores and press fits need to be dimensioned for it or masked.
Is hard anodize worth it for a faceplate?
Rarely. A faceplate is looked at, not rubbed, and Type II gives a better colour and a cleaner edge. Hard anodize earns its cost on parts that slide, thread or take abuse, such as volume knobs, rotating collars, feet and rack ears.
Need a quote for this part?
Send the drawing. We match you with up to 3 shops and reply within 24 business hours.
Get matched with an audio parts shop