Guides / Cost
Guitar Pedal and Pro-Audio Enclosures in Machined Aluminium
October 17, 2026
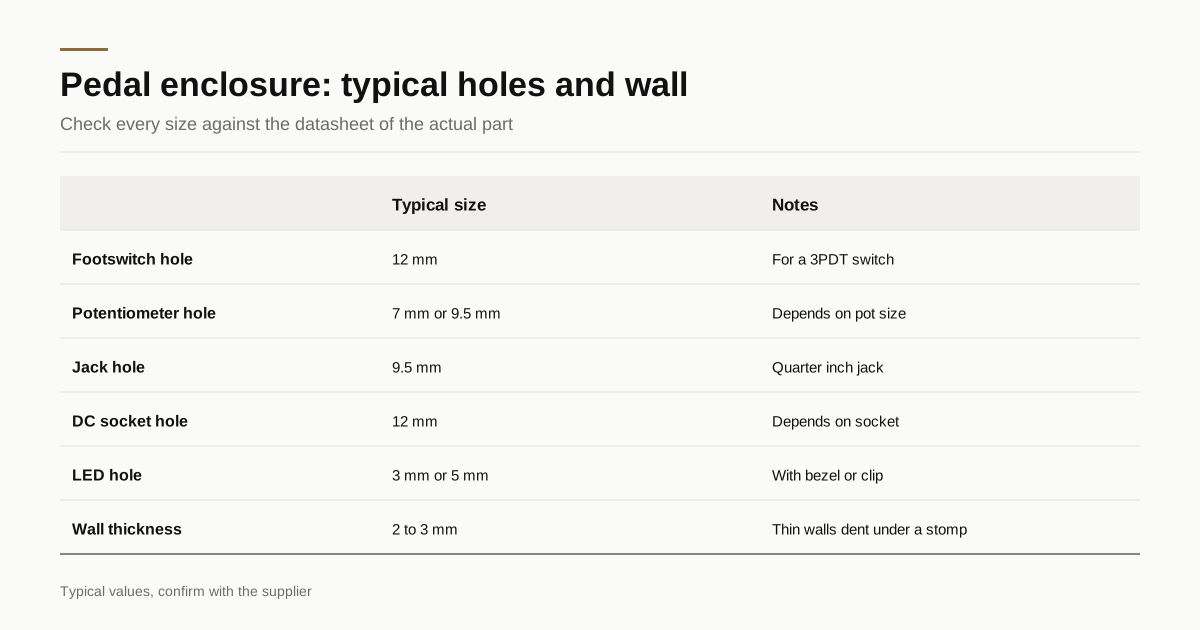
Guitar pedals and small pro-audio boxes are the most price-sensitive enclosures in the audio world and also the most cosmetic. A player sees the pedal every night, steps on it and puts it back in a bag. The enclosure takes that abuse, and the finish carries the brand. The manufacturing choices follow from that: cheap bodies, precise holes and a finish that has to survive.
Three ways to get a body
| Route | What it is | Strength | Limit |
|---|---|---|---|
| Standard cast blank | A die-cast aluminum box in a common size, bought in volume | Cheapest, many sizes, fast | Shape fixed, casting texture shows |
| Extruded body with end caps | A profile cut to length with machined or cast caps | Clean look, flexible lengths | Cap fit and alloy match |
| Machined from billet | A custom shape milled from solid aluminum | Any shape, premium feel | Highest cost per unit |
Most small makers start with a standard blank, drill it and finish it. The tooling cost is zero, since the blank already exists, and the finish is what makes it theirs. Larger or premium brands move to extruded or billet bodies to get a unique shape.
What a typical enclosure looks like
A common small pedal body is about 112 mm long, 60 mm wide and 31 mm deep, with 2 to 3 mm walls. Larger bodies suit multi-effect units or pedal boards with several controls. Wall thickness is the key number: thick enough to take a stomp without denting, thin enough to stay light and cheap.
Typical figures
These are typical values, not promises. Confirm with the shop quoting your part.
| Feature | Typical value | Notes |
|---|---|---|
| Wall thickness | 2 to 3 mm | Thin walls dent under heavy use |
| Footswitch hole | 12 mm | For a 3PDT switch |
| Potentiometer hole | 7 mm or 9.5 mm | Depends on pot size |
| Jack hole | 9.5 mm | For a quarter-inch jack |
| DC socket hole | 12 mm | Depends on the socket |
| LED hole | 5 mm or 3 mm | With a bezel or clip |
| Hole position tolerance | ±0.1 to ±0.2 mm | Tighter when legends surround holes |
| Typical run | 100 to 500 units | Small-batch work |
Always check hole sizes against the datasheet of the actual part, because the common sizes above vary between suppliers.
Drilling and machining the holes
A pedal has a handful of holes, so the drilling should be fast and repeatable. Three points matter.
Positioning. A CNC mill or a drilling machine with a fixture puts holes where the drawing says, within a fraction of a millimetre. Hand drilling with a template drifts, which shows when a legend circles a knob.
Hole quality. A sharp drill leaves a round hole with a small burr. The burr is removed on both sides. Die-cast aluminum can have hard spots and porosity near the surface, and extruded aluminum is more consistent.
Cutouts. Some designs have an open window for a display or a rectangular cutout for a switch. A milled cutout needs a corner radius, as discussed in connector panel cutouts for audio.
Drilling before finishing is the common order. Drilling after finishing risks chipping the coating at each hole.
Finish choices
Finish matters most in this product. The pedal is handled, kicked and stepped on.
Powder coat. A thick, even coat in almost any colour, with a slight texture. It hides casting marks and chips at edges rather than wearing off evenly. It is an electrical insulator, so grounding points need masking, which is covered in powder coating an audio chassis.
Anodize. A thin, hard coat that keeps the metal look. Type II in black or colour is common, and hard anodize holds up better to wear. It does not hide casting marks, so extruded or machined bodies suit it better. The type choice is in hard anodizing vs Type II.
Bead blast and clear anodize. A matte raw-metal look. It hides handling marks well and is popular on premium units. See bead blasting audio enclosures.
Paint and wet spray. Cheap and flexible, but the least durable under a stomp.
Lid, base plate and battery access
A pedal needs a way in, and the way in is part of the cosmetic design. Three layouts are common.
- Screwed base plate. Four screws hold a flat plate on the underside. It is simple and cheap, and the plate carries rubber feet or a non-slip pad.
- Hinged or lift-off lid. A battery door or a full lid gives quick access to a battery or a board. It needs a fit that does not rattle and a latch or screw that does not scratch the finish.
- Sliding or snap cover. A cover that slides along the body. It looks tidy and needs accurate machining on both parts.
Whatever the layout, mating faces need burr-free edges and a consistent gap. Anodize or powder coat on the joint adds thickness, so the fit should be checked after finishing, not before. Screw holes in thin walls often take self-tapping screws or small inserts, and the thread points in threads in anodized chassis apply here as well.
What damages an enclosure in use
Knowing the failure modes helps choose the finish and the wall.
Stomp loads. A foot adds several times the player’s body weight at the instant of impact, over a small area. A 2 mm wall under the footswitch can dish. A thicker wall or a stiffening boss under the switch prevents it.
Edge chipping. Boards are packed tightly and pedals rub against each other. Edges and corners lose paint first. A small radius on all outer edges, 1 to 2 mm, holds finish better than a sharp corner.
Sweat and grime. Hands and feet leave oils and salts. A sealed anodize or a smooth powder coat cleans easily. A rough matte surface collects dirt.
Stage lights. A glossy finish reflects stage lighting into the player’s eyes. Many makers choose matte finishes for exactly this reason.
Legends and graphics
A pedal carries a name, control labels and artwork. Four methods are common.
- Screen printing gives a solid coat of ink in one or two colours. It is cheap at volume and wears with use unless it has a clear topcoat.
- UV direct printing prints full-colour artwork straight onto the surface with UV-cured ink. It allows photo-quality graphics and holds up well with a clear coat.
- Laser engraving removes the coating or marks the metal. On black anodize it gives a clean white or grey mark that cannot wear off. It is slower per unit.
- Water-slide decals with a clear coat are used by small makers. They look good and take more handwork.
The trade-off between engraving and printing is covered in engraving vs silkscreen on audio panels. For a pedal that is used on a dark stage, a high-contrast mark matters more than a fine detail.
Pro-audio enclosures: the larger sibling
Pro-audio boxes such as DI boxes, preamps and small mixers use the same logic at a larger scale. Walls are thicker, connectors are heavier and the enclosure often needs to provide shielding. XLR connectors need larger cutouts with tighter tolerance, and the lid must close with continuous electrical contact, so anodize on the joint faces needs masking. The shielding rules are in EMI shielding for audio enclosures.
Pro-audio boxes also take rack ears or a rack panel. See rack panel dimensions for 19 inch gear for the standard dimensions.
Cost and quantity
At 100 to 500 units, cost is driven by the blank or body, the finish and the handling. A standard blank, drilled and powder coated, is the lowest cost. Anodizing and laser engraving cost more. A billet body is far above the others.
Setup costs matter at the low end. Program setup, fixtures and a first article are fixed charges, spread across the run. At 100 units they are a visible share of the price. At 500 they shrink. The general cost logic is in what an amplifier chassis costs to manufacture, and the effect of minimum quantities is in MOQ and lead time for audio parts.
Three decisions lower the bill.
- Use a standard blank, and put the design effort into the finish and graphics.
- Keep the hole pattern consistent across models, so the fixture is reused.
- Order one colour in volume, and limit variants to simple changes in print.
Inspection and packing
Pedals ship in boxes, and a scratch on a painted or anodized surface is a return. Parts should be wrapped individually, with the lid and body separated if they come as a pair. Inspection should check hole position, finish, legend alignment and the fit of the lid before packing. The inspection rule in cosmetic inspection lighting and viewing distance applies, with a closer viewing distance for a product held at arm’s length on a floor. Packing guidance is in packing finished audio parts.
What to put on the drawing and in the RFQ
- Body route: standard blank with size, extrusion with caps or custom billet
- Wall thickness and material
- Hole list with diameter, position and tolerance, with the part datasheet for each component
- Finish and colour, with a sample
- Legend method and artwork file, with a clear coat if printed
- Masked areas for grounding
- Quantity per variant and yearly volume
- Packing: individually wrapped
Send the drawing and the hole list through the RFQ form and we match them with up to 3 shops that drill, finish and mark small enclosures, with a reply within 24 business hours.
Frequently asked questions
What is the cheapest way to make a pedal enclosure?
A standard die-cast or extruded blank, drilled and finished. It is cheap because the blank is made in volume. A fully custom shape machined from billet costs several times more per unit and makes sense for premium or limited products.
Which finish survives being stepped on?
Anodize holds up better than most paint, and hard anodize better still. Powder coat is thicker and more forgiving of small impacts but chips at edges. Legends printed on top of any finish need a protective clear coat or laser engraving to last.
How accurate do the holes need to be?
Within about ±0.1 to ±0.2 mm for hole position, and hole diameters sized for the part, such as 12 mm for a footswitch and 7 mm for a potentiometer. Position matters most when the legend is printed or engraved around the holes.
Need a quote for this part?
Send the drawing. We match you with up to 3 shops and reply within 24 business hours.
Get matched with an audio parts shop