Guides / Design for Manufacture
Acrylic and Polycarbonate Windows for Audio Front Panels
October 11, 2026
A small window in a front panel carries a lot of weight: it shows the display, lets an indicator through, or adds a glass-like detail to an otherwise solid aluminum face. It is also the part most likely to fail an inspection, because plastic scratches, clouds and cracks in ways metal does not.
The two materials
Acrylic, also called PMMA, is rigid, very clear and takes a bright polish. It is the standard choice for display windows. Cast acrylic, made by pouring monomer between sheets and curing it, is better than extruded acrylic for machining and polishing, because it has less internal stress and a harder surface. Acrylic is brittle: it cracks under impact and under stress concentrated at a sharp internal corner.
Polycarbonate, or PC, is tough. It takes impact that would shatter acrylic and can bend a little without cracking. It is slightly less clear, scratches more easily on the surface and can yellow in sunlight unless the grade is UV-stabilised. It is also sensitive to some solvents and cutting fluids, which can cause fine cracks in stressed areas.
For a hi-fi product that sits on a shelf, acrylic is the usual answer. For a product that travels or takes knocks, polycarbonate earns its place.
Typical figures
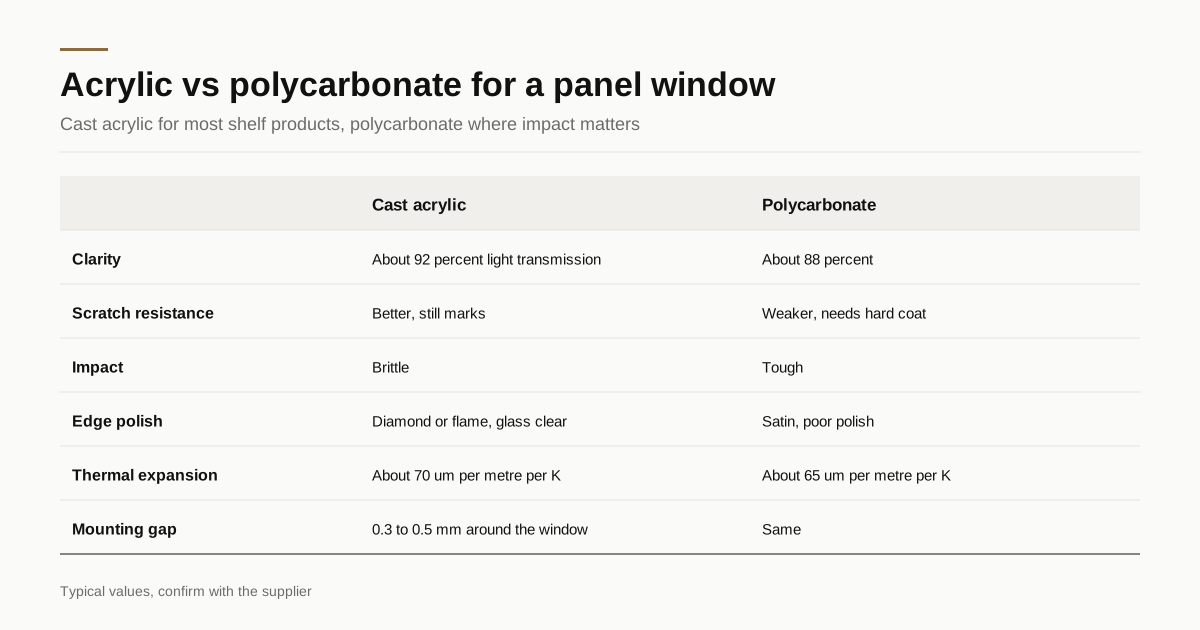
These are typical values, not promises. Confirm with the shop quoting your part.
| Property | Cast acrylic | Polycarbonate |
|---|---|---|
| Typical window thickness | 2 to 6 mm | 1.5 to 5 mm |
| Light transmission, clear | About 92 percent | About 88 percent |
| Scratch resistance | Better, still easy to mark | Weaker, needs hard coat |
| Impact resistance | Low, brittle | High |
| Thermal expansion | About 70 µm per metre per K | About 65 µm per metre per K |
| Edge polish | Excellent, diamond or flame | Poor, satin edge |
| UV stability | Good | Needs stabilised grade |
| Relative price | Baseline | Often higher |
Both expand roughly three times as much as aluminum, which has a figure near 23 µm per metre per K. That ratio drives the mounting design.
Cutting and shaping the window
Window shapes are cut by one of three routes.
CNC routing. A router cuts the outline and any pockets or steps. Sharp single-flute cutters with proper feeds give a clean edge. Heat is the enemy: melted plastic welds to the cutter and leaves a rough edge. Acrylic routed well can go straight to edge polishing.
Laser cutting. A CO2 laser cuts acrylic cleanly and leaves a flame-polished edge with a slight stress line. On polycarbonate, laser cutting discolours the edge and releases gas, so shops avoid it or accept a brown edge on hidden surfaces. Laser cutting also makes small internal corners easy, which routing cannot.
Waterjet. Rarely used for thin audio windows, because the edge is frosted and the plastic can chip at pierce points.
Internal corners need a radius. A sharp inside corner on a window concentrates stress and is a common crack starter. Specify at least a 1 to 2 mm radius on every inside corner, and a larger one where the window is clamped.
Edge finish
On acrylic, edge finish is a visible choice.
- Machined edge. Frosted, with tool marks. Fine for a hidden edge covered by a bezel.
- Diamond polished. A fine diamond cutter shaves the edge to a clear, glassy surface. It gives the cleanest look and works on straight and gently curved edges.
- Flame polished. A gas flame melts the surface layer. It is quick and gives a bright edge, but it can add stress and cause crazing later if overdone.
- Vapour polished. Solvent vapour smooths the edge. It suits shapes that are hard to reach with a cutter.
Polycarbonate edges are usually left as machined or lightly vapour polished. If the design needs a bright, glass-like edge, choose acrylic.
Scratches and coatings
Both plastics scratch far more easily than glass or anodized aluminum. A new window can look perfect on delivery and develop fine marks after a few months of dusting.
Hard-coated grades, where the supplier applies a scratch-resistant lacquer to one or both faces, improve this a lot. Polycarbonate nearly always needs a hard coat for a visible window. Anti-glare coatings diffuse reflections on a display window and reduce the mirror effect that makes a display hard to read in a bright room.
Protective film matters during production. The sheet arrives with a masking film, and it should stay on through machining and finishing and come off only at the last assembly step. Many scratched windows were scratched in handling, not in use.
Tint and transmission
A clear window shows everything behind it, including the circuit board and the screw heads. A tinted window hides them and lets only the display light through.
- Smoked or neutral grey tint transmits 30 to 60 percent of light and blanks the dark areas of a display, so it shows as a clean black panel until lit.
- Coloured tint such as red or amber can match an indicator colour.
- Frosted or diffused windows spread the light from LEDs behind them.
Tint changes how bright the display looks. A display that reads well behind clear plastic may look dim behind a heavy smoke tint, so test the real display behind the real window before committing a batch. Colour matching between a tinted window and an anodized panel is a judgement call, like the metal-to-metal case in anodize colour matching for hi-fi.
Mounting: leave room to move
Because plastic moves more than aluminum, a rigid mount causes trouble. A 100 mm wide acrylic window changes by about 0.14 mm over a 20 degree temperature swing, and an aluminum frame around it changes by about 0.05 mm. The difference is small but a window pressed into a tight pocket sees it as stress.
Four habits prevent most failures:
- Leave a gap. A clearance of about 0.3 to 0.5 mm around the window in the pocket lets it expand without touching the metal. Keep the gap even, because the bezel line shows uneven gaps. The wider issue is covered in panel gaps in audio enclosures.
- Use a flexible mount. Double-sided foam tape, a bead of a flexible adhesive or a soft gasket holds the window and absorbs movement. Rigid epoxy transfers stress.
- Do not clamp tight. If screws or a retaining plate hold the window, they should press lightly. Use shoulder screws or washers that limit the force.
- Keep adhesives compatible. Some adhesives and primers attack acrylic and polycarbonate and cause fine surface cracks, called crazing. Use ones rated for plastics and test a sample.
Machining the pocket in the panel
The window sits in a pocket or an opening in the aluminum front panel. Three details need agreement.
- Rebate depth. A ledge machined around the opening gives the window a seat. The depth should match the thickness plus the adhesive layer, so the window sits flush or slightly recessed.
- Corner radius. The pocket corners need a radius no smaller than the corner of the window, otherwise the window will not seat.
- Edge finish. The aluminum edge around the opening is visible. Specify a chamfer or break, and a bright chamfer is described in diamond cut chamfers on audio panels.
Thick panels also need care while the pocket is cut, as explained in machining thick front panels. A flat panel gives an even gap around the window.
Marking, printing and engraving
Windows often carry printed legends. Screen printing on the back face keeps the print protected behind the plastic. Laser engraving on acrylic gives a frosted white mark that glows when edge-lit. Engraving on polycarbonate tends to burn, so print instead. The marking choices for the surrounding metal are in engraving vs silkscreen on audio panels.
What to put on the drawing and in the RFQ
- Material: cast acrylic or polycarbonate, thickness, hard-coat or anti-glare requirement
- Tint and light transmission, with a reference sample
- Outline, inside corner radii and tolerance
- Edge finish: machined, diamond polished, flame polished
- Clearance around the window and the mounting method
- Marking: print side and method
- Protective film to stay on until final assembly
- Packing, with film left on and sheets interleaved
Send the drawing through the RFQ form and we match it with up to 3 shops that cut and polish plastic windows, with a reply within 24 business hours.
Frequently asked questions
Which is better for a display window, acrylic or polycarbonate?
For most hi-fi display windows, cast acrylic. It is clearer, scratches less and polishes to a clean edge. Polycarbonate is chosen when the window must survive impact, for example on a portable product or a pro-audio unit that gets knocked around.
Why did my window crack after assembly?
Usually from being fixed too tightly. Plastics expand and contract far more than aluminum, so a window pressed into a tight pocket cracks when the unit warms up or when a screw is overtightened. A small gap around the window and a flexible mount prevent most cracks.
Can the edge of the window be made clear?
On acrylic, yes. A diamond polish or flame polish gives a clear, glassy edge. Polycarbonate does not take these processes well, and its edges are usually left satin or lightly vapour polished.
Need a quote for this part?
Send the drawing. We match you with up to 3 shops and reply within 24 business hours.
Get matched with an audio parts shop